The genesis of this project was the repair of a small leak from the bottom edge of the inspection port plate in the port fuel tank. After the plate (with it’s fuel sender) was removed, the project expanded to replace the fuel level senders for both tanks which hadn’t been working for several years. The same process was employed on both the starboard and port tanks; the photos and descriptions provided here concern only the port tank (the starboard tank plate had no leak, but its fuel sender was not working).
On our DeFever 41 built in 1987, the fuel level sender for both diesel tanks (200 gallons each) is located on what amounts to an inspection port plate, located on the forward end of each tank, near the top of the tank. The plate is secured to the tank with 12 studs welded to the tank which project through the plate; separating the plate and the tank is a gasket. The fuel sender is mounted in the center of the plate on it’s own smaller round attachment plate and mounting bracket (inside the tank).
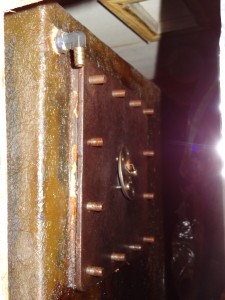
Photo #1 is of the port tank, forward end, after the retaining nuts have been removed and the sender mount loosened. The electrical lines connecting the sender unit to the gauge have also been removed.
The gray fitting in the upper left corner is the fitting for the genset fuel return line (which has been removed for access).
Access to the job-site required cutting a hole in the side of the engine room bulkhead that separated the fuel tank from the engine room because a hot water heater was placed forward of the fuel tank and would have been difficult to remove. Cutting the access hole was relatively easy using a multi-tool with a circular blade.
The plate was difficult to remove because of the limited area available forward of the tank (about 8”) between the tank and the water heater. The fuel sender plate needed to be loosened in order to permit it to be withdrawn from the tank with the inspection port plate. At the time, we weren’t sure about the structures on the inside of the tank other then that the sender unit was in there, somewhere.
Once the inspection plate and sender apparatus were removed the mechanical structure was obvious: the gauge fastened to an L-shaped bracket which in turn was welded to the circular attachment plate. The positive current from the gauge entered the sender through a circuit that penetrated the attachment plate and was isolated from the surrounding plate, then traveled to the sender via a wire; the sender was grounded to the bracket and the attachment plate and a spade connector (outside the tank) where the ground wire was attached. 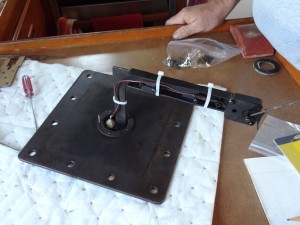
Photo #2 shows the entire interior-of-the-tank assembly (except for the flotation ball which is located at the end of the small rod extending to the right edge of the photo.
I had placed zip-tie fasteners along the red electrical line and added some hot glue to the point where the red line attached to an insulated thru-plate terminal thinking that everything could be reused if there was a simple way to fix the sender unit (the black box-like structure at the end of the bracket).
It soon became apparent that the sender unit was beyond repair and that the unit would need replacing.
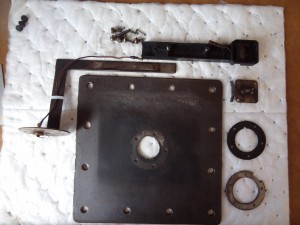
Photo #3 shows all the parts involved. Clockwise: sender attachment plate (seen still attached to the bracket), the bracket, the sender unit housing (which slides on the long arm of the bracket), the sender unit itself, the outside cover of the sender, the sender attachment plate gasket and inside fastening plate (threaded holes to accept bolts from the outside of the inspection plate).
The inside of the inspection port plate is shown. The lighter area is the surface covered by the gasket and the tank; the dark area is roughly the surface exposed to diesel in the tank.
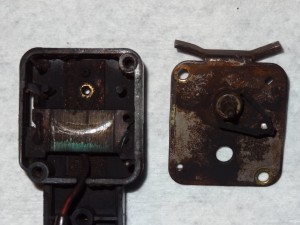
Photo #4 shows the inside of the sender unit, with the rheostat coil in the left image and the wiper arm shown in the right image. The coil had been damaged through wear and there was no way to repair it; replacement was the only alternative.
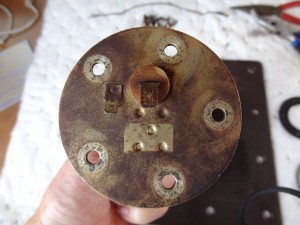
Photo 5-Sender attachment plate exterior showing positive and ground connectors. Showing faintly on the plate are “VDO” and “Australia”
This original sender attachment plate shown in photo #5 was not designed to be disassembled. The positive spade terminal imbedded in the plastic-like material required that the attached wire leading to the sender unit be soldered in place on a very short stud protruding on the inside face of the plate.
The search began for a new sender unit and a VDO unit was located that appeared to be an almost exact replacement – the almost part of the description had to do with whether it cold be adapted to the 90 degree bracket arm required to place the sender in the proper position and orientation in the tank.
Once the new sender arrived, it was obvious that the only modification needed was to cut the straight bracket arm and weld it back in place in a 90 degree orientation – creating the original L-bracket. The attachment holes fit the holes in the inspection port plate exactly!
The problem finding a sender for Sanderling’s tanks was that the new sender units were intended to fit into the tank from the top and have a vertical orientation. Since Sanderling’s tanks are virtually inaccessible from the top and the original senders were fastened through the end of the tanks, the sender brackets had to be reoriented (cut and welded) to provide a L-shaped bracket, similar to the original. The original bracket wasn’t used because I was concerned about the condition of the pass-through electrical connection and the need to provide a better soldered connection from the back-side of the pass-through to the wire running to the sender. There was no way to provide a heat sink to protect the plastic-like material which insulated the pass-through from the surrounding plate while soldering the connection.
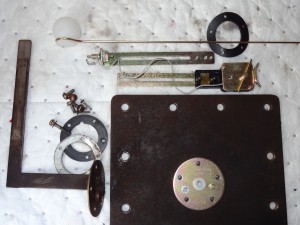
Photo 6-New sender bracket, sender unit with float and various other parts. New sender attachment plate is laying on the inspection port plate showing the holes aligned
Photo #6 shows the original L-shaped bracket still attached to the attachment plate along with the original gasket and metal backing plate. The new parts are at the top of the photo with the round sender attachment plate laying on the inspection port plate with the holes aligned. The bracket at the top was the one which was cut and then welded at 90 degrees.
The bracket was removed from the round attachment plate in order to cut and weld it without damaging the plastic material which insulates the positive feed to the sender as it penetrates the plate. The new sender attachment plate and bracket were designed to be disassembled.
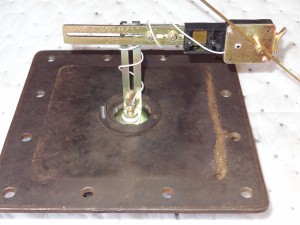
In Photo #7 everything is assembled and ready to be placed back into the tank. The float rod is shown extending from the mid-right upward and to the left.
The bracket arm to which the sender unit is attached was adjusted to place the sender about midway between the top and bottom of the tank. The float extends outward into the tank and will clear the forward-most baffle in the tank. The short end of the arm has been trimmed by about 2 inches and a “hook” bent into it to prevent it from falling out of the pivot pin should the retaining screw loosen.
The gasket which is placed between the inspection port plate and the tank wall was cut to fit the outline of the plate, the center rectangle removed leaving about 1/2” extra to extend into the tank, and the stud holes punched with a sharp hole punch. These studs and holes were 3/8” in diameter and the holes were punched to be 5/16” in diameter for a snug fit.
To replace the plate, the gasket was fitted over the studs, then the assembly was carefully fed through the rectangular hole in the tank. On the port tank the sender attachment plate had to be loosened (again, to work it into the tank through the 8” space available between the tank and the hot water heater) and then tightened once the plate was in place. That maneuver was not necessary on the starboard tank because there was full access to the inspection port. Once in place, the electrical lines from the gauge were fastened to the screw terminals and the genset fuel return line reconnected.
List of materials (for each tank):
VDO fuel sender unit- Source: Egauges.com – Part # 226-001 – Fuel Sender – 10-180 Ohms – $25.95
(http://egauges.com/vdo_send.asp?Sender=10_180ohms)
Gasket – Source: Grainger.com – Item no: 1XYG7 – Rubber, Buna-N, 3/16 In Thick, 12 x 12 In – $9.24 (Rubber Sheet, Oil Resistant, Commercial Grade, Buna-N/Nitrile Rubber, Thickness 3/16 In, Width 12 In, Length 12 In, Black, Smooth Finish, Non-Adhesive Backing Type, Min. Temp. Rating -30 F, Max Temp. 220 F, Durometer 50A, Elongation 300%, Tensile Strength 1000 PSI, Standards ASTM D2000 BF)
Time involved (not counting the time spent finding the materials, trip to the welding shop and contemplating options): 2 hours per tank.

